Torrid Desert
|
This article or section presents information pertaining to Pikmin: Connection of the Worlds, a fanon game created by PikFan23. |
|
|
| Torrid Desert | |
|---|---|

| |
| Treasures | TBA |
| Hazards | Fire, electricity, water, quicksand |
The Torrid Desert is the fourth and second largest area in Pikmin: Connection of the Worlds. It's a giant desert, far from the reaches of the Great Volcano, which has been put to sleep by the player's actions. The desert has three oases, one at the beginning, one at the middle of the desert, and one at the end of the desert. At the end of the desert, there is a mountain that can be partially explored (it can be fully explored once you have Green and Brown Pikmin). As the area is a desert, it's very hot here and very cold at night. You will be exploring the desert (explained below), so the day-night cycle is different here than other areas. Tan Pikmin are also discovered in one of the caves, and there are four caves total. It is accessed by finding the Silver Key at the Garden.
Exploration of the Torrid Desert
In order to find the Golden Key, which is necessary for unlocking the Shimmering Lake, you need to cross the entire, vast reaches of the desert. Deserts are naturally hot during the day, and cold during the night, so be prepared for sluggish Pikmin. The heat is a bigger issue than the cold, because if your Pikmin are not doused with a little bit of water, they could die. Because of that, there are plenty of cacti in the desert for the captains to punch open, and you store it in a bottle you found earlier, at the Peaceful Well. You can explore the main desert region during the day AND the night. Different music will play during the day and night. Also, during the night, Pikmin won't need water because they'll be cool. Enemies are sand-based and will usually be lurking in the sand. There are some quicksand patches, which appear as dark regions of sand spiraling into a single spot. Deep chasms are also present here so watch where you're walking. If you're at one of the oases, you can leave and take a break and return to that same oasis. So be ready when you decide to explore the Torrid Desert...
Subareas
Subarea 1: Landing Site
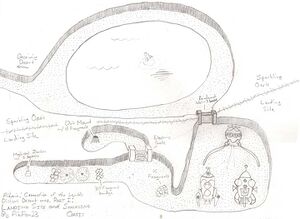
This is the landing site of the area, shaded by palm trees that tower overhead. The Sparkling Oasis to the north is initially blocked by a reinforced wall. To the immediate west is a pile of 15 fragments. Beyond it, the path splits: the northern path is blocked by an electric gate, and behind it is a dirt mound containing another 15 fragments. The western path is an incomplete bridge requiring 30 fragments to complete. On the other side is a Medusal Slurker with three bomb rocks. These bomb rocks may be used to destroy the reinforced wall, allowing access to the Sparkling Oasis.
Subarea 2: Sparkling Oasis
The first oasis in the desert you'll encounter, the oasis here has lots of life that rely on the water that exists here. Enemies, harmful and harmless have lived here for a while. Two Burgeoning Spiderworts in this area grow at the base of a palm tree. Enemies here are regular, dirt-based, sand-based, and water-based, but are spread out and are mildly easy to defeat.
Subarea 3: Deceiving Desert
The desert is laden with traps here—quicksand, abysses, and, most infamously, heat. Make sure you have some water in your bottle to pour on your Pikmin with. More sand-based enemies are here, but if you make your Pikmin fight them, they become more dehydrated quickly, so stay away from them. If you start to get low on water, find a cactus and punch it open so you can refill your bottle. The Grainy Realm will be found in the middle in this part of the desert here, and Tan Pikmin are found there.
Subarea 4: Mountain Oasis
Smaller than the previous oasis, this one has no harmful enemies and just a few patches of Nectar Weed and some Pellet Posies. Refill your water bottle if necessary. The Ships and the Onions have also moved here, if you haven't noticed. The Subterranean Lake is in plain sight.
Subarea 5: Desert Cave
The interior of this mountain has several tunnels and chambers inside it, allowing the player to continue with their exploration. Several torches are on the walls, letting the player see. However, there are a few traps, such as walls that collapse when the player nears them, or quicksand traps. Near the center of the mountain rests the Golden Key. When the player approaches it, some tunnels collapse and others open, changing the maze, so the player needs to be careful retrieving the Key. If the player loses it, it appears where the player last had it.
Beyond the resting spot of the Golden Key is a hidden tunnel. This tunnel splits in two at a point, however, these are blocked by obstacles. The tunnel leading left is blocked by an ice gate, only destroyable by Cyan Pikmin, and the tunnel leading right is blocked by a dirt wall, only destroyable by Brown Pikmin. These tunnels lead to the Ancients' Desert and the Mountainous Ravine, respectively.
Subarea 6: Ancients' Desert
The desert extends beyond the mountain. This part is bigger than the part the player explored, and the enemies are slightly tougher. There are also a few ruins in the sand. These ruins contain traps, but also withhold two valuable treasures.
Subarea 7: Faraway Oasis
This is the last of the oases you'll find here, with three palm trees shading the oasis. The Ships/Onions have moved here. A few enemies, as well as a Burgeoning Spiderwort and some Pellet Posies, are here. The Scalding Complex is also found here, too.
Caves
| Cave Name | Subarea | Floors | Pikmin Discovered? |
|---|---|---|---|
| Grainy Realm | Deceiving Desert | 7 | Tan Pikmin |
| Subterranean Lake | Central Oasis | 5 | N/A |
| Scalding Complex | Mountain Oasis | 9 | N/A |
| Mountainous Ravine | Desert Cave | 12 | N/A |
Wildlife
- Sandy Dweevil
- Sandy Bulborb
- Water Dumple
- Red Bulborb
- Dwarf Red Bulborb
- Armored Cannon Beetle
- Armored Cannon Beetle Larva
- Decorated Cannon Beetle
- Yellow Wollywog
- Sandy Burrow-nit
- Water Beetle
- Male Sheargrub
- Shearwig
- Puffy Blowhog
- Watery Blowhog
- Breadbug

